Flat stitch teaches how to bring the needle in and out through the fabric, and this is probably the most important thing of learning how to stitch the embroidery.
Most stitches begin by making a flat straight stitch. Similarly, many flat stitches can be combined in various creative patterns to come up with different variations.
Flat stitches are easier to work on even weave fabric such as canvas, matte, cross stitch fabric.
Here are some samples which I did for
example.
Straight stitch
It is a simple single stitch. The stitch itself is a complete stitch. You can make desired length of stitch to create designs. It can be straight or diagonal. The stitch can make flowers, grass, leaves, sun rays, etc. This can also be worked as border.

Straight stitch flower and leaf

Straight stitch border
Fern stitch
To make this stitch you need to know straight stitch. As the name suggests, its about leaves, an easy and good stitch to work on tree branches, leaves, grass, seaweed etc. It is made of group of three straight stitches; one group has one ending hole. A series of this is stitched to make row or column.

Fern stitch seaweed pattern
Arrow Head Stitch
To make this stitch you need to know straight stitch. This stitch is also the variation of straight stitch. As the name suggests,shape of arrow. It is a group of two straight stitches. Thus two straight stitches are joined to form arrow shape. The groups are stitched repeatedly to make a design of border or can also be worked on a desired pattern. When worked horizontally it can form a nice zigzag pattern. To bring perfection in this stitch 3 parallel points of equal distance should be marked.

Arrow head stitch pattern

Arrow head stitch border
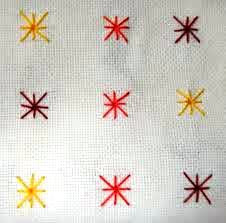
Algerian eye stitch
Also known as: Star stitch, Algerian eyelet stitch, star eyelet stitch
As the name suggests, shape of star. This stitch is a group of eight straight stitches. Thus eight straight stitches are joined to form a star like pattern inside a square area. All stitches are taken from single hole i.e center of the square. The Algerian eye stitch can be used as a filling stitch on even weave fabric in a wonderful way. Or can be used to form the border design. The stitch can make small flowers.
Also known as: Broderie anglaise, Hakoba
Eyelet stitch is not a flat stitch but a nice variation of straight stitch.
To make this stitch you need to know straight stitch. As the name suggests, a hole in fabric. This stitch helps to create a small hole in the fabric with a work of thread around it. Instead of a circle it can also be worked with any other shapes, like square, oval, pear. To make this stitch every time the stitch is taken through the hole. Eyelet stitch can be used instead of metal eyelet in any handmade project.

To make this stitch you need to know straight stitch. This stitch
is also the variation of straight stitch. As the name suggests, creating seeds.
This stitch uses two simple straight stitches together to fill in
patterns. It is a short and easy stitch. The stitch reminds of strawberry seeds,
watermelon, berries etc. this inspired its name.


This stitch is just a disorder of straight stitches used to fill patterns. It does not follow any straight line or pattern, rather its name suggests it not having a pattern. It is a set of two straight stitch, first stitch is longer and second stitch is shorter and in other direction. It looks like grass over the ground, or it depends on your perception.
Algerian eye stitch
Eyelet stitch
Eyelet stitch is not a flat stitch but a nice variation of straight stitch.
To make this stitch you need to know straight stitch. As the name suggests, a hole in fabric. This stitch helps to create a small hole in the fabric with a work of thread around it. Instead of a circle it can also be worked with any other shapes, like square, oval, pear. To make this stitch every time the stitch is taken through the hole. Eyelet stitch can be used instead of metal eyelet in any handmade project.

Eyelet flower
Seed stitch
Also known as: seeding stitch, rice stitch.

Seeds of strawberry
Random stitch
Filling random stitch
This stitch is just a disorder of straight stitches used to fill patterns. It does not follow any straight line or pattern, rather its name suggests it not having a pattern. It is a set of two straight stitch, first stitch is longer and second stitch is shorter and in other direction. It looks like grass over the ground, or it depends on your perception.


